Mini Cart

Picture Frame Sizes UK: You’ve got a print, a poster, or a favourite photo, and you want a frame for it. Then you find that frame sizes come in three different systems at once: inches (6×4, 10×8), centimetres (30×40, 50×70) and A-sizes (A4, A3). They don’t line up neatly, and a frame that’s “nearly” the right size can leave a gap, crop part of your picture, or not close at all.

This guide brings together all common UK picture frame sizes in one place. You’ll find complete charts in cm, inches and A-sizes, conversions between them, which print sizes fit which frames, and the mistakes people most often make when buying. Bookmark it, and you won’t need to guess again.

If you already know your size, you can go straight to our full range of picture frames. Otherwise, read on.

How are picture frame sizes measured in the UK?

Before the charts, it helps to understand the one rule that causes the most confusion.

A frame’s size is the size of the picture it holds, not the outside measurement of the frame.

A “10×8 frame” is designed to hold a 10×8 inch photo. The frame itself will be larger once you add the moulding (the border of wood or other material around the edge). A frame with a 2cm moulding is about 4cm bigger in each direction than its stated size.

This matters in two situations:

  1. When you’re fitting a frame into a space such as a shelf, an alcove or a gallery wall layout, measure using the outside dimensions, not the picture size.
  2. When you’re buying a frame for a print, measure the print and buy the frame with that size. Don’t measure an old frame from edge to edge and order that number.

The front edge of the moulding (the “lip”) also overlaps the picture by a few millimetres on each side so it stays in place. Expect about 3–5mm of the edges to be hidden. If your print has important detail or a signature right at the edge, consider a mount (more on that below) or a slightly larger frame.

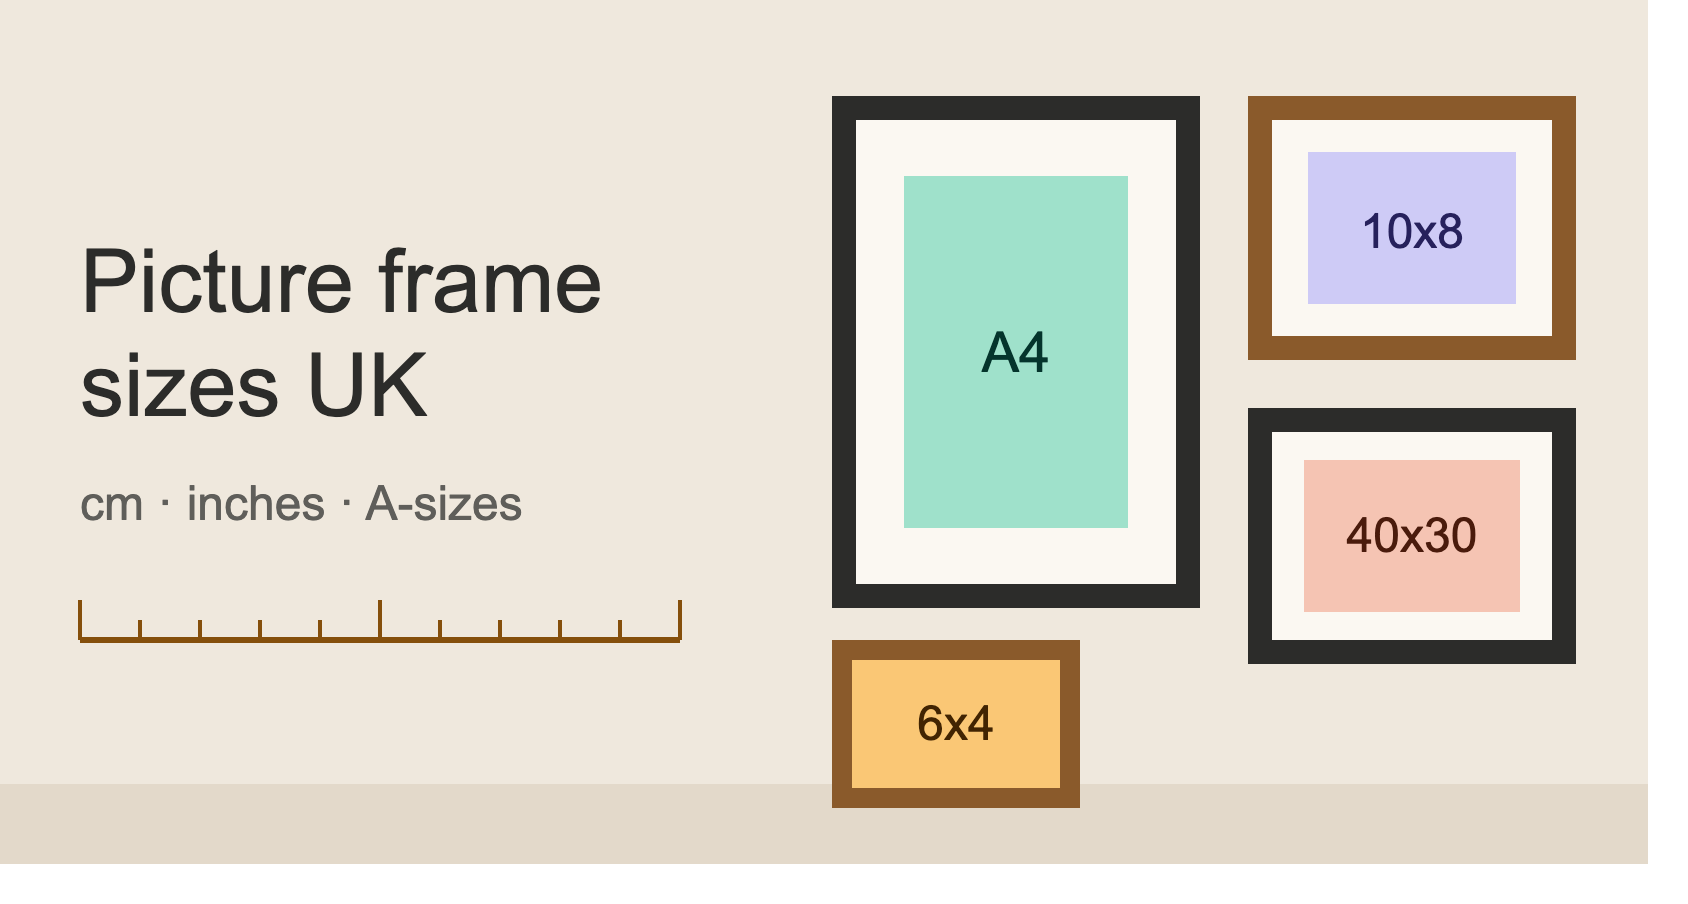
Picture frame sizes UK chart: inches (with cm conversions)
a_series_sizes_halving_diagram

Inch sizes are the traditional standard for photo prints in the UK, and they’re still what most high street and online printing services use. Here are the common sizes with their exact metric equivalents.

Frame size (inches) Size in cm Common use
5 x 3.5 12.7 x 8.9 Small prints, wallet photos
6 x 4 15.2 x 10.2 Standard photo print
7 x 5 17.8 x 12.7 Larger standard print, desk frames
8 x 6 20.3 x 15.2 Phone photos (4:3 shape)
9 x 6 22.9 x 15.2 Camera photos (3:2 shape)
10 x 8 25.4 x 20.3 Portraits, school photos, certificates
12 x 8 30.5 x 20.3 Larger camera photos
12 x 10 30.5 x 25.4 Portraits, art prints
14 x 11 35.6 x 27.9 Art prints, mounted 10×8 photos
16 x 12 40.6 x 30.5 Large phone photo prints
20 x 16 50.8 x 40.6 Wall art, mounted 14×11 prints
24 x 18 61.0 x 45.7 Large posters, wall art
30 x 20 76.2 x 50.8 Large camera photo enlargements
36 x 24 91.4 x 61.0 Maxi posters

Quick conversion: 1 inch = 2.54cm. To convert inches to centimetres, multiply by 2.54. To go from cm to inches, divide by 2.54.

Smaller sizes such as 6×4 and 7×5 are ideal for desks, mantelpieces and bedside tables. Browse our mini picture frames for these. For standard rectangular inch sizes on the wall, see our rectangle picture frames.

Picture frame sizes UK chart: centimetres (with inch conversions)

Metric frame sizes are common for art prints, posters and anything bought from European printers and shops. Many online art print sellers use cm sizes as standard, so if your print came from one of them, this is the chart to use.

Frame size (cm) Size in inches Common use
10 x 15 3.9 x 5.9 Photo prints (close to 6×4)
13 x 18 5.1 x 7.1 Photo prints (close to 7×5)
20 x 30 7.9 x 11.8 Art prints, photos
30 x 40 11.8 x 15.7 Art prints, phone photo enlargements
40 x 50 15.7 x 19.7 Art prints, wall art
50 x 70 19.7 x 27.6 The most popular poster size in Europe
60 x 80 23.6 x 31.5 Large wall art
60 x 90 23.6 x 35.4 Large posters
61 x 91.5 24 x 36 UK standard maxi poster
70 x 90 27.6 x 35.4 Large wall art
70 x 100 27.6 x 39.4 Statement wall art
80 x 60 31.5 x 23.6 Large landscape prints
100 x 70 39.4 x 27.6 Large landscape wall art
120 x 80 47.2 x 31.5 Oversized statement pieces

Note that 10 x 15cm and 6×4 inches are close but not identical. A 10x15cm print in a 6×4 inch frame leaves a small gap, and the difference between 13x18cm and 7×5 inches is similar. Inside a frame, those few millimetres are often noticeable, so match the system your print was made in.

For bigger sizes, our maxi picture frames go from 60cm up to 120cm. Popular choices include the Maxi Picture Frame 60 x 80 cm for portrait-orientation art, and the Maxi Picture Frame 90 x 60 cm and Maxi Picture Frame 80 x 60 cm for landscapes.

A-size frame chart (A5, A4, A3, A2, A1, A0)

A-sizes are the international paper sizes used across the UK, so they’re the default for anything printed at home or in an office: certificates, documents, children’s artwork, downloadable prints and many posters.

A-size Size in mm Size in cm Size in inches Common use
A6 105 x 148 10.5 x 14.8 4.1 x 5.8 Postcards, small prints
A5 148 x 210 14.8 x 21.0 5.8 x 8.3 Small prints, notes, cards
A4 210 x 297 21.0 x 29.7 8.3 x 11.7 Certificates, documents, home prints
A3 297 x 420 29.7 x 42.0 11.7 x 16.5 Art prints, small posters
A2 420 x 594 42.0 x 59.4 16.5 x 23.4 Posters, wall art
A1 594 x 841 59.4 x 84.1 23.4 x 33.1 Large posters
A0 841 x 1189 84.1 x 118.9 33.1 x 46.8 Very large posters, plans

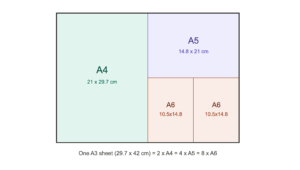
The neat thing about A-sizes is that each size is exactly half of the one above it. Two A4 sheets side by side make an A3, two A3s make an A2, and so on. That’s why they all share the same proportions, and why an A4 design scales up to A3 or A2 without cropping.

For a more detailed look at these sizes, read our guide to A-series photo frame sizes explained, or shop our A-series frames directly.

A4 vs 10×8: the most common mix-up

The question we hear most often is whether an A4 print fits a 10×8 frame. It doesn’t.

  • A4 is 21.0 x 29.7cm (8.3 x 11.7 inches).
  • 10×8 is 20.3 x 25.4cm (8 x 10 inches).

A4 is slightly wider and about 4cm longer. Put an A4 certificate in a 10×8 frame, and you’ll have to trim it, losing part of the document. In the other direction, a 10×8 photo in an A4 frame leaves a visible gap. For certificates and documents, always use an A4 frame.

Square picture frame sizes

Square prints have become very popular thanks to Instagram and square-format print services. Common square frame sizes include:

Square frame size (cm) Size in inches Common use
20 x 20 7.9 x 7.9 Instagram-style prints
30 x 30 11.8 x 11.8 Art prints, vinyl-style artwork
40 x 40 15.7 x 15.7 Wall art
50 x 50 19.7 x 19.7 Statement prints
60 x 60 23.6 x 23.6 Large statement pieces

Square frames also work well in gallery walls, where a grid of identical squares gives a clean, modern look. Explore our square picture frames, including the large Maxi Picture Frame 60 x 60 cm.

Poster frame sizes

Posters come in several standard sizes, and they don’t always match photo or art print sizes. Here are the ones you’re most likely to come across in the UK:

Poster type Size in cm Size in inches
A3 poster 29.7 x 42.0 11.7 x 16.5
A2 poster 42.0 x 59.4 16.5 x 23.4
50 x 70 poster 50 x 70 19.7 x 27.6
A1 poster 59.4 x 84.1 23.4 x 33.1
UK maxi poster 61 x 91.5 24 x 36
US one-sheet (film poster) 68.6 x 101.6 27 x 40

The UK maxi poster (61 x 91.5cm) is the classic size sold in music, film and gaming shops. If you’ve bought a poster from a high street retailer, this is probably what you have. Our maxi poster frames are made for this format.

Film posters from cinemas or collectors are often the US one-sheet size of 27 x 40 inches. This doesn’t fit a maxi frame, so measure before you order.

Panoramic frame sizes

Panoramic photos are much wider than they are tall. Typical proportions are 2:1 or 3:1, compared with about 3:2 for a normal camera photo. They’re perfect for landscapes, cityscapes, group photos and wide beach scenes.

Because panoramic prints vary so much, measure your print carefully before choosing a frame. Our panoramic photo frames come in a range of wide formats.

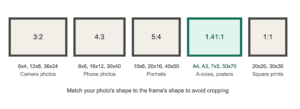
Which frame fits your photo? Understanding aspect ratios

Aspect ratio is the shape of a picture: how its width compares to its height. Knowing your photo’s ratio is the easiest way to pick a frame size that won’t crop your image.

Aspect ratio Where it comes from Frame sizes with this shape
3:2 DSLR and mirrorless cameras, standard prints 6×4, 9×6, 12×8, 30×20, 36×24 inches
4:3 Most phone cameras (default setting) 8×6, 16×12 inches; 30x40cm; 60x80cm
5:4 Traditional portrait prints 10×8, 20×16 inches; 40x50cm
~1.41:1 A-sizes, 7×5, 50x70cm A5–A0, 7×5 inches, 50x70cm, 100x70cm
1:1 Instagram, square prints All square frames
2:1 to 3:1 Panoramic photos Panoramic frames

Two useful things follow from this table:

  1. Phone photos suit 8×6, 16×12 and 30x40cm. If you print a phone photo as a 6×4 (which is 3:2), you lose a strip from the top or bottom. Printing it as 8×6 keeps the whole picture.
  2. A-sizes, 7×5 and 50x70cm share almost the same shape. So an A-size design can be printed at 50x70cm, and a 7×5 photo can be scaled up to A4 or A3 with almost no cropping.

Frame sizes with a mount: what fits inside?

A mount (also called a mat) is the card border between your picture and the frame. It gives the picture breathing space, keeps it off the glass, and makes even a small print look more substantial on the wall.

When you use a mount, the frame is bigger than your print. Here are common pairings:

Print size Frame size with mount
6 x 4 inches 10 x 8 inches
7 x 5 inches 10 x 8 inches or A4
8 x 6 inches 12 x 10 inches
10 x 8 inches 14 x 11 inches or 16 x 12 inches
A4 A3 or 40 x 30cm
A3 A2 or 50 x 40cm
30 x 40cm 40 x 50cm
40 x 50cm 50 x 70cm

Three tips for mounted frames:

  • The mount’s window (the “aperture”) should be a few millimetres smaller than your print on each side so the print stays in place behind it.
  • A wider mount looks more upmarket and gallery-like. Around 5–8cm is a good border for medium-sized frames.
  • Many people make the bottom border slightly deeper than the top. Called “bottom weighting”, it makes the picture look visually centred on the wall.
photo_frame_aspect_ratios_compared

How to measure your picture correctly

Getting the measurement right takes less than a minute and saves a return.

  1. Lay the print flat on a table. Don’t measure it rolled or curled.
  2. Measure the width and height using a metal tape measure or ruler. Fabric tape measures stretch.
  3. Measure in both cm and inches if you can. You’ll see straight away which system your print was made in, because one will come out as a round number (for example, exactly 50 x 70cm, or exactly 10 x 8 inches).
  4. Decide what to show. If you want the whole print visible, including any white border, frame to the full paper size. If you only want the image, measure the image area and consider a mount instead.
  5. Check the outside dimensions of the frame you’re choosing if it needs to fit a particular space.

For more detail on matching a frame to your room as well as your print, see our guide on how to choose the right picture frame size.

Choosing the right size for your wall

The print size is only half the story. A frame also needs to suit the wall it hangs on. A few rules of thumb:

  • Above a sofa or bed, the artwork (or group of frames) should cover about two-thirds of the furniture’s width. A single small frame above a three-seater sofa will look lost.
  • On a large empty wall, go big. A maxi picture frame such as the 100 x 70 cm or 120 x 80 cm makes a statement on its own.
  • In hallways and narrow spaces, smaller frames from A4 to 40 x 50cm work best, because people view them up close.
  • For a gallery wall, mix sizes but keep a common thread, such as the same frame colour or matching mounts. Our step-by-step guide to creating a gallery wall walks you through planning the layout.
  • For a natural, warm look, wooden picture frames suit most interiors and pair well with art prints and family photos alike.

Common frame size mistakes to avoid

  • Mixing up inches and cm. A 10x15cm print is not the same as a 6×4 inch frame. Always match the system.
  • Assuming A4 fits a 10×8 frame. It doesn’t. A4 is longer and slightly wider.
  • Measuring the old frame instead of the picture. Order by picture size, not outside dimensions.
  • Forgetting the lip. A few millimetres of each edge sit behind the frame. Leave a margin around signatures and important details.
  • Printing phone photos at 6×4. The shapes don’t match, so part of your photo gets cut off. Choose 8×6 or 16×12 instead.
  • Ignoring the wall. A frame can fit the picture perfectly and still look wrong because it’s too small for the space.

Frames for special occasions

Some photos deserve a frame chosen with extra care. Wedding photos are usually printed at 7×5, 10×8 or 12×8 inches for the album, with larger enlargements for the wall. Our wedding photo frames are designed for exactly these moments, and they make a thoughtful gift for newlyweds or anniversaries.

Frequently asked questions

What is the most popular picture frame size in the UK?
For photos, 6×4 and 7×5 inches are the most common, because they match standard prints. For wall art, A3, A4, 30 x 40cm and 50 x 70cm are among the most popular.

What size is a standard photo in the UK?
The standard photo print in the UK is 6×4 inches (15.2 x 10.2cm). 7×5 inches is the next most common.

What size frame do I need for an A4 certificate?
An A4 frame (21 x 29.7cm). If you want a mount around it, choose an A3 frame with an A4 mount.

Is 30 x 40cm the same as 12 x 16 inches?
Very nearly. 12 x 16 inches is 30.5 x 40.6cm, so a 12×16 print in a 30x40cm frame would need a tiny trim. Match the system your print was made in for a perfect fit.

What size is a maxi poster in the UK?
A standard UK maxi poster is 61 x 91.5cm (24 x 36 inches).

What frame size fits a 50 x 70 poster?
A 50 x 70cm frame without a mount. With a mount, go up to 60 x 80cm or 70 x 100cm.

Do frame sizes include the frame border?
No. The stated size is the size of the picture the frame holds. The outside dimensions are larger by the width of the moulding on each side.

Find your perfect frame

Once you know your size, finding the right frame is easy. At PhotoFramed, we stock more than 100 sizes in inches, cm and A-sizes, with fast UK delivery and 30-day returns. Browse our full range of picture frames, or go straight to a category:

Still unsure which size you need? Get in touch with our team, and we’ll help you find the right fit.
Continue Reading →

A series photo frame: Choosing the right photo frame can make a surprising difference to how your favourite photograph, artwork, certificate or print looks on the wall. But with so many sizes available, finding the perfect fit can sometimes be confusing.

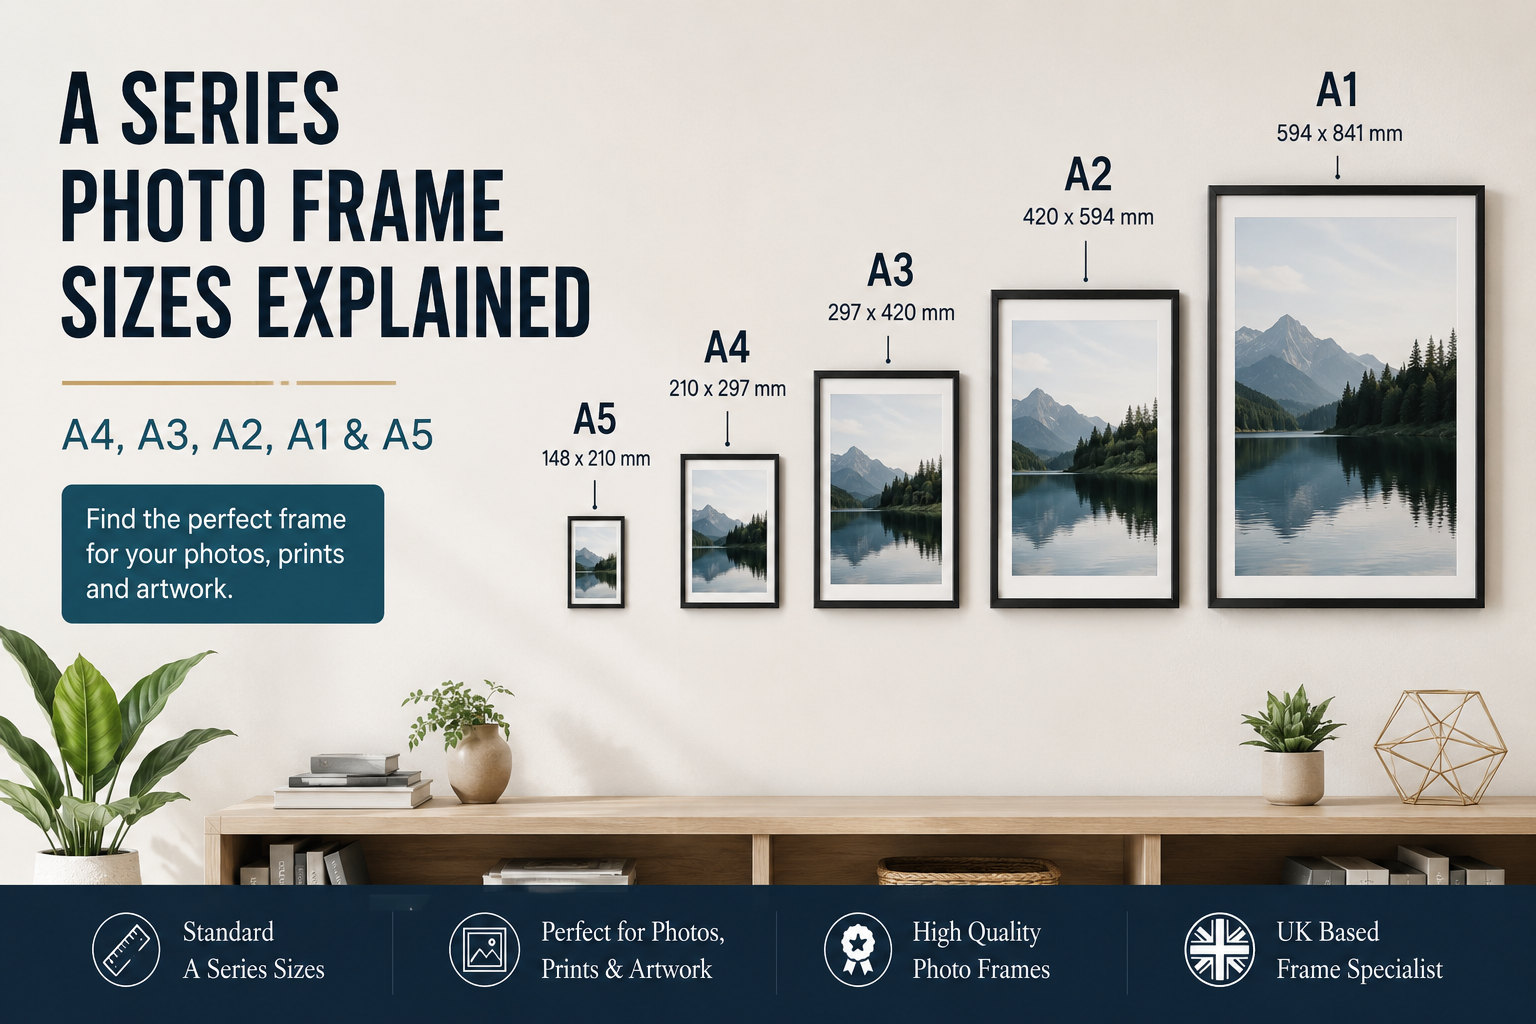
If you’re comparing A series photo frame sizes, you’re in the right place. The A series sizing system makes it much easier to choose a frame because the dimensions follow a standard format. From compact A5 frames to large A1 frames, each size has a specific purpose and works well with different types of prints and displays.

In this guide, we’ll explain the most popular A series photo frame sizes, including A5, A4, A3, A2 and A1, and help you decide which option is best for your space.

What Are A Series Photo Frame Sizes?

A-series sizes are based on an internationally recognised paper-sizing system. The same dimensions are used for many prints, posters, documents, photographs and pieces of artwork.

The main sizes discussed in this guide are:

Size Dimensions in mm Dimensions in cm
A5 148 × 210 mm 14.8 × 21 cm
A4 210 × 297 mm 21 × 29.7 cm
A3 297 × 420 mm 29.7 × 42 cm
A2 420 × 594 mm 42 × 59.4 cm
A1 594 × 841 mm 59.4 × 84.1 cm

One of the useful things about A series photo frame size measurements is that each size is approximately twice the area of the next smaller size. For example, two A5 sheets placed together make an A4-sized area, while two A4 sheets make an A3.

This makes the system particularly convenient when selecting frames for standard-sized prints.

A5 Photo Frames: Small and Versatile

An A5 photo frame measures 148 × 210 mm internally, making it a practical choice for smaller photographs, prints, illustrations and documents.

A5 frames work particularly well on desks, shelves, bedside tables and smaller sections of wall. They’re also useful when you want to create a collection of several framed pictures rather than displaying one large image.

You could use an A5 frame for:

  • Family photographs
  • Small art prints
  • Illustrations
  • Children’s artwork
  • Inspirational prints
  • Small certificates or documents
  • Desk and shelf displays

Because of their compact size, A5 frames can also be combined with larger frames to create an attractive gallery wall.

A4 Photo Frames: A Popular Everyday Choice

The A4 photo frame size is 210 × 297 mm and is one of the most commonly used frame sizes in homes and offices.

A4 is particularly convenient because many photographs, prints, certificates and documents are produced in or close to this format. If you have an A4-sized print, choosing an A4 frame provides a straightforward framing solution.

An A4 frame can be used for:

  • Photography prints
  • Certificates
  • Artwork
  • Family pictures
  • Posters
  • Children’s drawings
  • Office documents
  • Inspirational quotes

A4 frames are small enough to work in compact spaces but large enough to make an image noticeable. You can also display them individually or arrange them in groups.

For a modern gallery wall, you can position several A4 frames together in a symmetrical or more relaxed arrangement.

A3 Photo Frames: Make Your Pictures Stand Out

Moving up to A3 photo frames, the dimensions are 297 × 420 mm.

An A3 frame gives your image considerably more visual presence than an A4 frame without becoming difficult to accommodate in most rooms.

A3 is a popular choice for photography, artwork, and decorative prints. It works particularly well when you want an image to become a noticeable feature without using a very large frame.

Consider an A3 frame for:

  • Landscape photography
  • Portrait photography
  • Art prints
  • Illustrations
  • Posters
  • Travel photography
  • Family photographs
  • Decorative wall prints

If your wall has plenty of open space, an A3 frame can create a stronger focal point than several small frames.

You can also combine A3 frames with A4 or A5 frames to create a layered gallery-wall effect.

A2 Photo Frames: Ideal for Larger Artwork

An A2 photo frame measures 420 × 594 mm. This larger format is ideal when you want your artwork or photograph to have a stronger presence on the wall.

A2 frames are particularly suited to large photography prints, artwork, posters, and decorative pieces.

Because an A2 print has a larger surface area, it can display detail much more effectively than smaller formats. This makes it a great option for photographs with interesting landscapes, architecture, or intricate artwork.

A2 frames can work especially well in:

  • Living rooms
  • Bedrooms
  • Hallways
  • Offices
  • Studios
  • Reception areas
  • Large feature walls

When choosing an A2 frame, remember to consider the surrounding space. A large frame can look impressive, but it should have enough room around it to remain visually balanced.

A1 Photo Frames: Create a Real Statement

At 594 × 841 mm, an A1 photo frame is one of the larger standard A-series options.

A1 is an excellent choice when you want your photograph, artwork or poster to become the main feature of a wall. The larger format provides plenty of space for detailed images and bold designs.

A1 frames are commonly suited to:

  • Large photographic prints
  • Posters
  • Artwork
  • Professional displays
  • Maps
  • Photography collections
  • Large decorative prints

An A1 frame can be particularly effective above a sofa, bed, desk or large piece of furniture. It can also be used as a standalone statement piece where you want one image to command attention.

Before purchasing an A1 frame, measure your available wall space carefully. Don’t forget to account for furniture, doors, windows, and other decorative items around the frame.

A Series Photo Frame Sizes Chart

If you’re unsure which A series photo frame size you need, this quick chart comparison can help:

A5 – 148 × 210 mm
Best for smaller photographs, prints and compact displays.

A4 – 210 × 297 mm
A versatile everyday size for photographs, certificates, artwork and documents.

A3 – 297 × 420 mm
A great choice for artwork and photographs that need more visual impact.

A2 – 420 × 594 mm
Ideal for larger prints, posters and feature-wall displays.

A1 – 594 × 841 mm
Perfect for large artwork, photography and statement pieces.

Remember that these measurements refer to the standard A-series paper or print dimensions. The overall external dimensions of a frame can be larger because of the frame moulding and any mount included.

How Do You Choose the Right A Series Photo Frame Sizes?

The best frame size depends on more than the dimensions of your picture. Think about the purpose of the print, the wall available, and the visual effect you want to create.

1. Measure Your Print

Start by measuring the actual print rather than guessing the size. Measure both the width and height and compare these measurements with the A-series dimensions.

If your print is A4, an A4 frame is usually the natural starting point. However, you may also want to consider a larger frame with a mount for a more premium appearance.

2. Consider the Wall Space

A small frame can disappear on a large empty wall, while an oversized frame may dominate a small room.

For smaller areas, A5 and A4 can be excellent choices. A3 and A2 are better suited to creating stronger focal points, while A1 works particularly well on larger feature walls.

3. Think About the Image

Not every photograph has the same visual impact. A detailed landscape photograph may benefit from a larger A2 or A1 display, while a simple family photograph might look just as effective in an A4 or A5 frame.

4. Decide Whether You Want a Mount

A mount can create space between the artwork and the frame, giving the finished display a more sophisticated appearance.

For example, an A4 print could be displayed inside a larger frame with a suitable mount. This changes the overall look while giving the photograph additional visual breathing room.

Can You Mix Different A Series Photo Frame Sizes?

Absolutely. In fact, combining different A series photo frame sizes can be an excellent way to create an interesting gallery wall.

For example, you could combine A3, A4, and A5 frames around a central photograph. Alternatively, you can arrange several A4 frames in a neat grid for a clean, contemporary look.

When mixing sizes, try to create some visual consistency. Using the same frame colour or material across different sizes can help the collection feel intentional rather than random.

Black frames can provide a modern appearance, while white and wood-effect frames can create a softer or more traditional feel.

A-Series Frames for Every Style of Display

One of the biggest advantages of A series framing is flexibility. Whether you’re framing a treasured family photograph, a favourite piece of artwork or a professionally printed poster, there’s likely to be an A-series size that suits your project.

At PhotoFramed.co.uk, choosing the right frame should be straightforward. By understanding the dimensions of A5, A4, A3, A2 and A1, you can confidently select a frame that complements both your print and your space.

Final Thoughts

Understanding A series photo frame sizes makes choosing the right frame much easier. A5 and A4 are ideal for smaller displays and everyday prints, while A3 provides more visual impact. A2 and A1 are excellent choices for larger artwork, photography, and statement wall displays.

Before ordering, always check the exact dimensions of your print and compare them with the frame’s stated image or aperture size. Also consider whether you want a mount and how the frame will fit into the surrounding space.

Whether you’re creating a gallery wall or displaying one special photograph, selecting the right A series frame sizes can transform a simple print into something worth looking at every day.

Continue Reading →

A gallery wall is one of the easiest ways to turn a plain wall into something personal. Whether you want to display family photographs, wedding memories, holiday pictures or favourite artwork, a carefully planned collection of frames can make a room feel warmer and more individual.

The good news is that you don’t need to be an interior designer to create one. With the right combination of photographs, frame sizes, colours and spacing, you can create a gallery wall that looks balanced without feeling too formal.

In this guide, we’ll show you how to create a gallery wall from start to finish, including how to choose your frames, arrange your pictures and avoid some of the most common mistakes.

What Is a Gallery Wall?

A gallery wall is a collection of framed photographs, prints, artwork or other decorative pieces arranged together on one wall.

There isn’t a single correct layout. Some gallery walls are perfectly symmetrical, while others use different frame sizes and orientations to create a more relaxed look.

You can use a gallery wall to:

  • Display family photographs
  • Showcase wedding memories
  • Create a feature wall in your living room
  • Display holiday photographs
  • Decorate a hallway or staircase
  • Add personality to a bedroom
  • Create a focal point above a sofa or sideboard
  • Display a mixture of photographs and artwork

The key is to make the arrangement feel intentional rather than simply putting several pictures on the wall.

1. Choose the Right Wall

Start by deciding where your gallery wall will go.

A large blank wall above a sofa is a popular choice, but gallery walls can work almost anywhere. Hallways, staircases, bedrooms, dining rooms and home offices can all provide excellent spaces.

Look at the furniture around the wall before choosing your frames.

For example, a gallery wall above a sofa should generally relate visually to the width of the furniture below it. Similarly, a display above a console table should leave enough room between the furniture and the bottom frames.

Don’t forget to consider doors, windows, light switches, and other features that could affect your layout.

2. Decide What You Want to Display

Before buying frames, decide what will actually go inside them.

You might choose:

  • Family photographs
  • Wedding photographs
  • Children’s photographs
  • Holiday memories
  • Black-and-white photography
  • Artwork
  • Prints
  • Inspirational quotes
  • A mixture of photographs and artwork

A gallery wall doesn’t have to follow one theme, but having some connection between the pieces will make the finished display feel more cohesive.

For a family gallery wall, for example, you could combine photographs from different years while keeping the frames in complementary colours.

3. Choose Your Frame Sizes

This is where you can make your gallery wall really interesting.

Instead of using identical frames throughout, consider combining different sizes.

For example:

  • 60 × 60 cm
  • 50 × 50 cm
  • 40 × 50 cm
  • 30 × 40 cm
  • Smaller portrait or landscape frames

A larger square frame can act as the centrepiece, while smaller frames can surround it.

PhotoFramed offers a range of frame sizes, including large 60 × 60 cm and 60 × 80 cm formats as well as smaller frames, giving you flexibility when creating a mixed-size arrangement.

If you’re unsure where to start, our picture frame size guide explains how to choose the correct frame dimensions for your photographs.

4. Decide Whether to Match or Mix Frame Colours

You have two main approaches.

Matching frames

Using the same frame colour throughout creates a clean, coordinated appearance.

Black frames are particularly effective when you want a strong contrast against a light wall. White frames can create a softer, brighter appearance.

Matching frames work especially well for:

  • Modern interiors
  • Minimalist rooms
  • Black-and-white photographs
  • Symmetrical layouts
  • Professional-looking displays

Mixed frames

Mixing colours and finishes can make your gallery wall feel more relaxed and personal.

For example, black, white, oak and rustic finishes can be combined if the overall arrangement has enough visual consistency.

The trick is not to mix everything randomly. Try keeping either the frame style, photograph style or colour palette consistent.

PhotoFramed’s range includes black, white, oak and rustic finishes, making it possible to create either a coordinated collection or a deliberately mixed display.

5. Pick a Gallery Wall Layout

There are many ways to arrange a gallery wall, but you don’t have to follow a complicated formula.

Here are five popular layouts.

The Grid

A grid uses evenly sized frames arranged in rows and columns.

It creates a neat, symmetrical appearance and works particularly well when your photographs have similar dimensions.

For example, six or nine matching square frames can create a simple and organised display.

The Centrepiece

Choose one larger frame and arrange smaller frames around it.

This works particularly well if you have one photograph that deserves extra attention.

A 60 × 60 cm frame can make a strong central piece, with smaller photographs arranged around it.

The Organic Layout

Use different frame sizes and orientations to create a more relaxed arrangement.

This style works particularly well for family photographs because you don’t need every image to have the same proportions.

The Horizontal Row

Arrange several frames in a straight horizontal line.

This can work beautifully above:

  • Sofas
  • Sideboards
  • Beds
  • Dining furniture
  • Console tables

Keep the spacing relatively consistent to maintain a clean appearance.

The Staircase Layout

A staircase wall is an excellent place for a gallery wall.

Rather than creating one large rectangle, follow the angle of the stairs with your frames.

Start with the overall shape of the staircase and work outwards, rather than trying to make every frame line up perfectly.

6. Lay Everything Out Before Drilling

This is one of the most useful gallery wall tips.

Don’t start putting holes in the wall immediately.

Instead, lay your frames on the floor and experiment with different arrangements.

Start with the largest frame and position the smaller frames around it.

Once you’re happy, measure the gaps between the frames and note the position of each frame.

You can also cut pieces of paper or cardboard to the same size as your frames and attach them to the wall with removable tape.

This allows you to see the complete arrangement before making any permanent changes.

7. Keep the Spacing Consistent

The space between your frames can have a big effect on the finished appearance.

If the gaps are too large, the arrangement may feel disconnected.

If they’re too small, the wall can look crowded.

As a starting point, try leaving around 5–8 cm between frames, then adjust depending on the size of your display.

Larger frames may need slightly more breathing room, while smaller frames can often be positioned closer together.

The most important thing is consistency.

8. Think About the Overall Shape

Before hanging your frames, look at the gallery wall as one large shape.

It could be:

  • A rectangle
  • A square
  • A vertical arrangement
  • A horizontal arrangement
  • An organic shape
  • A series frames

Try to keep the outer edges reasonably balanced.

For example, if one side extends much further than the other, the entire arrangement can look uneven even if the individual frames are perfectly straight.

This is why laying everything out first is so useful.

9. Consider the Height

One of the biggest mistakes people make is hanging a gallery wall too high.

If the display is above a sofa or other furniture, the bottom of the arrangement should have enough breathing room without appearing disconnected from the furniture.

For a standalone wall, the centre of the overall arrangement is usually more important than the position of an individual frame.

Rather than deciding the height based on one picture, think of the entire gallery wall as one large piece of artwork.

10. Choose Photographs That Work Together

Your frames don’t have to contain identical types of images.

You could combine:

  • Family portraits
  • Holiday photographs
  • Wedding pictures
  • Children’s drawings
  • Black-and-white photographs
  • Colour photography
  • Artwork

However, too many unrelated images can make the wall feel chaotic.

One way to create consistency is to use a common colour palette.

For example, if most of your photographs contain warm tones, oak or rustic frames may complement them nicely.

If you’re using mostly black-and-white photographs, black or white frames can create a particularly clean appearance.

11. Don’t Forget Orientation

Mixing portrait and landscape photographs can make a gallery wall more dynamic.

For example, you might place a large landscape photograph in the centre and surround it with portrait photographs.

Square frames can help bridge the difference between portrait and landscape formats.

When planning your arrangement, place photographs with similar orientations beside one another only when it helps create the shape you’re looking for.

12. Create a Gallery Wall Around One Special Photograph

If you have one photograph that means particularly much to you, use it as the starting point.

This could be:

  • A wedding photograph
  • A family portrait
  • A favourite holiday picture
  • A photograph of your children
  • A meaningful black-and-white image

Choose a larger frame for that photograph and use smaller frames to build the display around it.

This gives your gallery wall a natural focal point.

For a large square photograph, a 70cm×50cm picture frame can work especially well as a centrepiece.

Explore PhotoFramed’s 50×70 frame 

13. Choose Frames That Suit Your Interior

Your gallery wall should feel connected to the rest of the room.

Modern interiors

Black or white frames can create a crisp, contemporary look.

Natural interiors

Oak frames can work beautifully alongside wood, plants and natural textures.

Traditional interiors

Rustic or warmer finishes can complement classic furniture and décor.

Minimalist interiors

A smaller number of carefully selected frames can have more impact than filling an entire wall.

There is no requirement to use one frame colour throughout. Choose the combination that works with your room and the photographs you’re displaying.

14. Don’t Make Every Frame the Same Size

One of the easiest ways to create a more interesting gallery wall is to vary the dimensions.

A mixture of large and small frames creates visual movement.

For example, you might use:

1. 60 × 60 cm

2. 40 × 50 cm

3. 30 × 40 cm

Several smaller frames

The exact combination isn’t important. What matters is creating a balanced overall shape.

If you have a large number of photographs to display, start with a few key images rather than trying to fit everything onto the wall.

You can always expand the gallery wall later.

15. Make It Personal

The best gallery walls don’t look like they came straight from a showroom.

They tell a story.

You could create a timeline of your family, display photographs from important holidays, combine wedding photographs with older family pictures or create a collection of moments from your children’s childhood.

Don’t worry if the photographs aren’t all professionally taken.

A slightly imperfect family photograph can have much more emotional value than a technically perfect image.

That’s what makes a gallery wall personal.

Common Gallery Wall Mistakes to Avoid

Hanging everything too high

Consider the entire arrangement rather than one individual picture.

Using too many frame styles

Mixing styles can work, but too much variation can make the display feel chaotic.

Making all the gaps different

Inconsistent spacing is one of the quickest ways to make a gallery wall look unfinished.

Not planning beforehand

Always test your arrangement before drilling into the wall.

Using frames that are too small

A collection of tiny frames can disappear on a large wall.

Consider including one or two larger pieces to anchor the arrangement.

Forgetting the furniture

Your gallery wall should work with the furniture underneath it rather than looking like a completely separate element.

How Many Frames Do You Need for a Gallery Wall?

There is no fixed number.

A small gallery wall might contain three or four frames, while a large staircase or living-room wall could accommodate ten, fifteen or more.

Start with the available wall space rather than a target number.

For a smaller area, three to six carefully selected frames may be enough.

For a larger feature wall, you can gradually add more frames until the composition feels balanced.

Can You Mix Black and White Picture Frames?

Yes.

Black and white frames can work particularly well together because they provide contrast without introducing too many competing colours.

For example, black frames can be used for stronger visual anchors, while white frames can soften the overall arrangement.

You can also introduce oak or rustic frames if you want to bring warmth into the display.

For more ideas, see our guide to black vs white picture frames.

How to Create a Gallery Wall Without Making Holes

If you’re renting or don’t want to drill into the wall, there are alternatives to traditional picture hooks.

Depending on the weight of your frames and the type of wall, removable hanging strips or other appropriate hanging solutions may be suitable.

Always check the manufacturer’s weight limit and make sure the fixing method is appropriate for both the frame and the wall surface.

For heavier frames, use a suitable permanent fixing rather than relying on a lightweight adhesive solution.

Gallery Wall Checklist

Before you start, make sure you have:

  • Your photographs or artwork
  • Frames in the appropriate sizes
  • A tape measure
  • Pencil
  • Spirit level
  • Measuring tape
  • Removable tape or paper templates
  • Appropriate wall fixings
  • A rough layout plan

Then:

  1. Choose your wall.
  2. Decide what you want to display.
  3. Measure the available space.
  4. Choose your largest frame.
  5. Select complementary smaller frames.
  6. Decide whether to match or mix colours.
  7. Arrange everything on the floor.
  8. Test the arrangement on the wall.
  9. Measure the spacing.
  10. Hang the frames.
  11. Step back and check the overall balance.

Frequently Asked Questions

What is the best layout for a gallery wall?

There isn’t one best layout. A grid works well for a neat, symmetrical appearance, while mixed-size or organic layouts create a more relaxed look. Choose the layout that suits your wall, furniture and photographs.

How far apart should picture frames be on a gallery wall?

Around 5–8 cm is a useful starting point. The ideal distance depends on your frame sizes and the overall arrangement. The most important thing is to keep the spacing reasonably consistent.

Should gallery wall frames match?

They don’t have to. Matching frames create a coordinated appearance, while mixed finishes can make the display feel more relaxed and personal. If you mix frame colours, keep another element consistent to create cohesion.

How many pictures should be on a gallery wall?

Anything from three or four frames to a much larger collection can work. Let the size of your wall determine the number rather than trying to reach a particular figure.

What size frames work best for a gallery wall?

Mixing sizes often produces the most interesting result. A larger frame such as 50 × 50 cm or 60 × 60 cm can provide a focal point, while smaller frames can be arranged around it.

Can I mix portrait and landscape frames?

Yes. Combining portrait, landscape and square photographs can make your gallery wall more dynamic. Plan the arrangement so the different orientations create a balanced overall shape.

What colour frames are best for a gallery wall?

It depends on your room and photographs. Black creates contrast, white feels clean and light, oak adds warmth, and rustic finishes can create a more traditional appearance.

Create Your Own Gallery Wall With PhotoFramed

A gallery wall should be more than a collection of pictures on a wall. It should reflect the people, places, and memories that matter to you.

Start with one photograph you love, choose a frame that gives it the attention it deserves, and build the rest of your display around it. Mix sizes where appropriate, keep your spacing consistent, and don’t be afraid to experiment before you start hanging.

Whether you’re looking for a large square centrepiece, smaller frames for family photographs or several different sizes for a complete feature wall, explore PhotoFramed’s picture frame collection to find frames in a range of sizes and finishes.

Your gallery wall doesn’t have to be perfect. It just has to be yours.

Continue Reading →

Choosing the right picture frame size can make a surprisingly big difference to how a photograph, print, or piece of artwork looks on your wall. A frame that is too small can make an image feel lost, while one that is too large can overwhelm the room.

The good news is that choosing a picture frame size doesn’t have to be complicated. Once you know the size of your artwork, where you want to display it, and the overall look you’re trying to create, finding the right frame becomes much easier.

Whether you’re framing a family photograph, wedding picture, art print, or creating a gallery wall, this guide explains how to choose the right picture frame size for your home.

Start With the Size of Your picture frame size or Artwork

The most important measurement is the picture frame size of the image or artwork you want to frame.

Measure the actual photo or print from edge to edge, including the width and height. For example, if your photograph measures 30 × 40 cm, look for a frame designed to hold artwork measuring 30 × 40 cm.

It’s worth remembering that the artwork size and the outside dimensions of a frame are not necessarily the same. A frame has its own moulding around the edge, so always check the product’s stated artwork size before ordering.

If you’re unsure which size you need, measuring your photograph first will prevent the most common framing mistake: buying a frame based only on its external dimensions.

Common Picture Frame Sizes

Picture frame sizes come in a wide range of dimensions, from small frames for individual photographs to large formats designed to become a focal point on a wall.

Some popular sizes include:

  • 5 × 4 inches
  • 7 × 5 inches
  • 8 × 10 inches
  • 18 × 24 cm
  • 30 × 40 cm
  • 40 × 50 cm
  • 50 × 50 cm
  • 60 × 60 cm
  • 60 × 80 cm

The best size depends on the photograph, the available wall space, and how prominent you want the image to be.

For smaller photographs, a compact frame can work beautifully on a bedside table, desk, shelf or console. Larger frames are better suited to walls where you want the artwork or photograph to become a noticeable feature.

Should Your Frame Be the Same Size as Your Photo?

In many cases, yes.

If your photograph is already the exact size you want to display, choosing a frame made for that artwork size gives you a simple, clean finish.

For example, a 60 × 60 cm photograph can be placed directly into a 60 × 60 cm frame designed to hold artwork of that size. PhotoFramed’s Maxi Picture Frame 60 × 60 cm is available in black, white, oak, and rustic finishes, giving you several options for matching your interior.

However, you don’t always have to use a frame that matches the photograph exactly.

When Should You Use a Larger Frame?

A larger frame can be useful when you want to create a more substantial display or use a mount around a smaller photograph.

For example, a smaller print can be positioned inside a larger frame with a border or mount around it. This creates a more traditional, gallery-style appearance and can give the image greater visual importance.

A larger frame can also work well when you’re designing a feature wall or combining several different frame sizes.

The important thing is to make sure the artwork, mount, and frame are compatible with the available rebate depth.

How to Choose a Frame for a Large Photograph

Large photographs need a picture frame size that has enough presence to complement the image without distracting from it.

For example, a 60 × 80 cm frame can make an excellent statement piece above a sofa, console table, bed or desk. PhotoFramed’s 60 × 80 cm Maxi Picture Frame is designed for artwork of that size and is available in black, white, oak and rustic finishes.

Before choosing a large frame, consider:

  • The size of the wall
  • The furniture underneath it
  • The orientation of your photograph
  • The colour of your walls
  • The frame finish
  • Whether you want one large statement piece or several smaller frames

A large frame doesn’t necessarily need a large room. The key is to give it enough surrounding space so that the wall doesn’t feel crowded.

Choosing the Right Frame Size for a Gallery Wall

Gallery walls are more flexible because you can combine several frame sizes rather than relying on one large frame.

For example, you could combine:

  • One large square frame
  • Two medium rectangular frames
  • Several smaller portrait or landscape frames

The result can feel much more personal than using identical frames throughout.

A useful approach is to choose the largest frame first and then build the surrounding arrangement around it.

Square frames can work particularly well as focal points. For example, a 50 × 50 cm or 60 × 60 cm frame can provide a strong central element, with smaller photographs arranged around it.

For more inspiration, see our guide on How to create a gallery wall?

How Much Space Should You Leave Around a Picture Frame size?

There’s no single rule that works for every room, but giving a framed picture some breathing room generally makes the display look more intentional.

If you’re hanging one large picture, avoid placing it so close to other furniture or wall features that it feels squeezed into the space.

For gallery walls, leave consistent gaps between frames. Around 5–8 cm is a useful starting point, although the ideal spacing depends on the size of your frames and the wall.

Before putting holes in the wall, arrange the picture frame size on the floor first. You can experiment with different layouts until you’re happy with the proportions.

How to Choose Between Portrait and Landscape Frames

The orientation of your photograph should also influence your frame choice.

Portrait photographs

Portrait frames work particularly well for:

  • Family portraits
  • Wedding photographs
  • Individual photographs
  • Certificates
  • Fashion photography
  • Tall artwork

Landscape photographs

Landscape frames are ideal for:

Some PhotoFramed products support both portrait and landscape orientation, giving you greater flexibility when arranging your display.

Don’t Forget the Room

The right frame isn’t just about the photograph. Think about where the frame will live.

Living room

A larger frame can work well above a sofa, sideboard or console. A 50 × 50 cm, 60 × 60 cm or 60 × 80 cm frame can create a strong focal point depending on the available wall space.

Bedroom

For bedrooms, consider photographs or artwork that create a calm and personal atmosphere. Medium-sized frames can work above a bedside table, dresser, or chest of drawers.

Hallway

Hallways often benefit from smaller or medium-sized frames arranged as a collection. Several family photographs can turn an otherwise plain corridor into a personal display.

Home office

Smaller photographs, certificates and artwork can be displayed on a desk or wall. Table-top frames are particularly useful if you don’t want to drill into the wall.

PhotoFramed offers smaller table-top options such as 5 × 4 inch, 7 × 5 inch and 8 × 10 inch frames, with several colour finishes available.

What Frame Size Should I Choose for a 60 × 60 Photo?

If your photograph or artwork measures exactly 60 × 60 cm, the simplest option is a frame designed to hold a 60 × 60 cm image.

PhotoFramed’s Maxi Picture Frame 60 × 60 cm is specifically designed for artwork of this size. It has a square format and is available in black, white, oak and rustic finishes.

A square frame can also work particularly well as the centrepiece of a gallery wall.

View the PhotoFramed 60 × 60 cm Picture Frame

Maxi Picture Frame 60 X 60 cm

Should All Your Picture Frames Be the Same Size?

Not necessarily.

Matching frame sizes create a neat, symmetrical appearance, while mixing sizes can make a display feel more relaxed and personal.

If you’re decorating a single wall with several photographs, consider combining different dimensions while keeping something consistent between them.

For example, you could use:

  • The same frame colour
  • The same frame material
  • Similar photograph styles
  • A consistent spacing between frames

This creates visual consistency without making the arrangement look too rigid.

How to Choose the Right Frame Colour

Once you’ve selected your picture frame size, think about the frame finish.

Black frames create contrast and can work particularly well with black-and-white photography, modern interiors and bold artwork.

White frames offer a clean, light appearance and can suit colourful photographs, minimalist rooms and bright interiors.

Oak frames bring warmth and can complement natural materials, wooden furniture and family photographs.

Rustic frames can add character to traditional, country or cottage-style interiors.

PhotoFramed currently offers these finishes across several frame sizes, making it easier to create a coordinated display or to intentionally mix different colours.

For more information, read our upcoming guide to black vs white picture frames.

Picture Frame Size Checklist

Before ordering a frame, check these measurements:

  1. Measure the width of your photograph.
  2. Measure the height of your photograph.
  3. Check whether the frame’s listed size refers to the artwork size.
  4. Decide whether you want a mount or border.
  5. Check the frame’s rebate depth if using additional materials.
  6. Consider portrait or landscape orientation.
  7. Measure your available wall or table space.
  8. Choose a frame colour that works with your room.
  9. Consider whether the frame will be displayed on its own or as part of a gallery wall.
  10. Check the product details before ordering.

Taking a few minutes to measure everything beforehand can save you from ordering the wrong frame size.

Frequently Asked Questions

What is the most common picture frame size?

There isn’t one universal size because photographs and artwork are produced in many different dimensions. Smaller formats such as 5 × 4, 7 × 5 and 8 × 10 inches are useful for individual photographs, while larger sizes such as 50 × 50 cm and 60 × 80 cm can work well as wall art or statement pieces.

How do I measure a photo for a frame?

Measure the actual photograph or artwork from one edge to the opposite edge, both horizontally and vertically. Use those measurements when choosing a frame and check whether the retailer’s stated dimensions refer to the artwork size or the frame’s external dimensions.

Should the picture frame size be bigger than the photo?

It can be. If you want a mount or border around your photograph, a larger frame may be appropriate. If you want a simple edge-to-edge display, choose a frame designed for the actual size of your photograph.

What size frame is best for a large wall?

It depends on the wall and furniture around it. A larger frame such as 60 × 60 cm or 60 × 80 cm can work well as a statement piece, while multiple smaller frames can create a gallery wall.

Can I mix different picture frame sizes?

Absolutely. Mixing frame sizes is one of the easiest ways to create a more interesting gallery wall. Keep one or two elements consistent, such as the frame colour, spacing or style, to make the overall display feel cohesive.

What size frame do I need for a 60 × 60 cm photo?

For a straightforward fit, choose a picture frame size designed to hold a 60 × 60 cm artwork. PhotoFramed’s Maxi Picture Frame 60 × 60 cm is designed for artwork of this size and comes in black, white, oak, and rustic finishes.

Find the Right Picture Frame Size at PhotoFramed

The right picture frame size should complement both your photograph and the space where it will be displayed.

Start by measuring your artwork, then consider the wall or surface, orientation, frame colour, and the overall style you’re trying to achieve. Whether you need a small frame for a favourite family photograph or a large statement frame for artwork, choosing the correct dimensions first makes the rest of the decision much easier.

Explore PhotoFramed’s picture frame collection to find frames in a range of sizes and finishes for your photographs, artwork and home décor.

Continue Reading →

Encapsulating memories has never been more critical in a world brimming with fleeting moments. Panoramic photo frames are timeless vessels that preserve and elevate these cherished moments in all their grandeur. As we navigate through life’s passages, these frames become windows into our pasts, holding stories waiting to be retold.

From humble beginnings to today’s intricate designs, panoramic photo frames have evolved alongside us, weaving into our lives’ fabric. Their significance stretches beyond mere aesthetics; they serve as portals to frozen emotions. Each frame whispers tales of love, joy, and adventure, capturing fragments of our existence that deserve to be celebrated and shared. Join us on a journey delving deep into the heart of these exquisite creations as we explore seven imaginative ways panoramic photo frames have mastered the art of elevating life’s most precious moments.

Enhancing Home Decor

Panoramic photo frames serve as mere picture holders and as captivating focal points in home decor, infusing living spaces with a personal touch that tells stories and evokes emotions. By carefully selecting panoramic frames that resonate with the interior design style of a room, one can seamlessly integrate these pieces into the overall aesthetic. For modern spaces characterized by sleek lines and neutral palettes, minimalist black frames can create a contemporary look while highlighting the photos. On the other hand, wooden panoramic frames can add warmth and understated charm for rustic-themed rooms with natural textures and earthy tones.

When it comes to arranging and displaying panoramic frames in homes, creativity knows no bounds. Mixing various Panoramic photo frames sizes to form unique gallery walls or creating a symmetrical grid display of panoramas can elevate the visual appeal of any room. The exciting idea is to use a single oversized panoramic frame as a striking statement piece above a fireplace or sofa to draw attention and enhance the room’s ambiance. Incorporating themed arrangements like travel memories or seasonal landscapes can also add depth and personality to different areas within a home, turning blank walls into dynamic storytelling showcases.

Additionally, experimenting with unconventional placements, such as leaning panoramic frames against shelves or layering them on top of each other on mantels, can bring an eclectic flair to home decor. Exploring the interplay between lighting fixtures and framed panoramas can further accentuate their beauty, casting shadows or reflections that amplify the impact of displayed images. By understanding how panoramic photo frames interact with interior design elements like furniture, color schemes, and lighting sources, individuals can curate spaces that reflect their personal style and communicate meaningful narratives through visually engaging displays.

Celebrating Special Occasions

Special occasions are essential in our lives, marking milestones that deserve to be cherished and remembered for years. Utilizing panoramic photo frames to celebrate these events adds a unique touch of personalization and elegance. Whether it’s a wedding picture capturing the blissful union of two souls or a graduation photo symbolizing years of hard work and achievements, framing these moments panoramically elevates their significance. Imagine walking into a room adorned with panoramic frames showcasing special occasions – each frame telling a story that warms the heart and sparks joy.

One creative way to celebrate special occasions using panoramic frames is by customizing them with personal photos. For instance, you can compile a series of images from a birthday party, creating a chronological display that encapsulates the essence of the celebration. These customized panoramic frames also make thoughtful gifts, offering a unique and sentimental present for birthdays, anniversaries, or other memorable events. Gifting personalized panoramic frames expresses thoughtfulness and ensures that the recipient has a tangible memento to cherish forever.

The emotional value of preserving cherished moments in high-quality panoramic frames cannot be overstated. Each glance at these framed memories evokes nostalgia, reigniting the emotions felt during those special occasions. Panoramic frames are more than just decor; they become storytellers narrating tales of love, success, joy, and unity. By investing in top-notch panoramic frames to preserve special occasions, individuals enhance their living spaces aesthetically and create an emotional connection with their past experiences. These frames become visual time capsules that immortalize fleeting moments into everlasting memories.

Showcasing Travel Memories

Travel memories hold a special place in our hearts, and what better way to relive those adventures than through the captivating display of panoramic photo frames? By curating collections of scenic photos from different destinations, you can transport yourself back to those unforgettable moments. Imagine gazing at a wall adorned with panoramic frames featuring the Eiffel Tower at sunset, the turquoise waters of Santorini, or the bustling streets of Tokyo – each frame telling a unique story of your travels.

Consider incorporating thematic elements into your panoramic displays to add an extra layer of storytelling to your travel memories. Include maps pinpointing the exact locations where your photos were taken; boarding passes or tickets that symbolize the beginning of your journey, or small souvenirs that evoke the spirit of each destination. These additional elements enhance the visual appeal of your display and provide context and depth to your travel experiences.

Moreover, when selecting photos for your panoramic frames, opt for shots that encapsulate the essence of each location – whether it’s a sweeping landscape capturing the grandeur of nature, a close-up detail highlighting intricate architecture, or a candid shot portraying local culture. By showcasing these breathtaking landscapes, iconic landmarks, and cultural encounters through panoramic frames, you document your travels and create an immersive gallery that celebrates the beauty and diversity of our world.

Capturing Family Bonding

When preserving cherished family togetherness, panoramic photo frames offer a unique opportunity to encapsulate these special memories grandly and timelessly. Displaying group photos in large-format panoramic frames highlights the bond shared among loved ones and serves as a focal point for storytelling within homes. Imagine capturing a multi-generational family reunion or a holiday gathering in one panoramic frame that can be prominently showcased in the heart of your living space.

To take this concept further, creating family galleries with chronological sequences or thematic arrangements using multiple panoramic frames adds an artistic flair to how family stories are portrayed visually. For instance, you could arrange a series of panoramic frames showcasing annual family vacations over the years, allowing visitors to catch glimpses of evolving travels and growing bonds within your clan. This intentional curation of moments beautifies your walls and creates an emotional journey for both residents and guests alike.

Moreover, by encouraging shared storytelling through elegantly designed panorama displays featuring generational family photos, you foster a sense of continuity and connection with your roots. Picture a gallery wall displaying images from your grandparents’ wedding alongside pictures capturing recent milestones like graduations or birthdays; each frame becomes a chapter in the ongoing narrative of your family’s legacy. These panorama displays don’t just adorn walls but are visual testaments to the enduring love, joy, and resilience that define your familial ties throughout generations.

Inspiring Creativity Through Collages

Panoramic photo frames offer a canvas for creativity, making collages a captivating way to personalize displays. By incorporating collage techniques, individuals can transform a series of photos into a cohesive narrative within a single panoramic frame. Imagine mixing travel snapshots with candid family moments in varying sizes and orientations to create an eclectic visual story that resonates with viewers. This approach adds depth and dimension to the display and allows for a dynamic storytelling experience that evolves with each glance.

To stimulate creativity further, consider adding DIY elements to your collage process. Whether using digital software or physically arranging prints, experimenting with different layouts, textures, and embellishments can enhance the overall impact of the panoramic photo display. For instance, overlaying images with handwritten notes or integrating memorabilia like tickets or pressed flowers can infuse personal touches into the collage, transforming it from a mere collection of photos into an artful representation of cherished memories. These thoughtful additions amplify the emotional connection to the images and highlight the significance of each moment captured.

Moreover, creating visually engaging collages using panoramic frames encourages individuals to explore unconventional ways of displaying their memories. For example, juxtaposing black-and-white portraits with vibrant landscapes or combining vintage photographs with contemporary shots can spark intriguing contrasts that draw attention to specific details within the composition. By breaking away from traditional framing norms and embracing artistic experimentation, panoramic collages become more than just arrangements of pictures. They become living pieces of art that invite interpretation and reflection. Ultimately, embracing collage techniques in panoramic displays unlocks endless possibilities for self-expression and storytelling through photography.

Sparking Nostalgia With Vintage Panoramic Photo Frames

Step into a world of nostalgia by adorning your walls with vintage-style panoramic photo frames that effortlessly transport you back to cherished past moments. Infused with timeless charm, these frames evoke a sense of wistfulness and reminiscence, making them perfect for preserving family histories or celebrating long-lasting relationships. Imagine curating a gallery wall filled with sepia-toned photographs in antique-looking panorama frames, each telling a unique story from days gone by. These vintage frames serve as decor pieces and portals to treasured memories, creating an ambiance of warmth and sentimentality within your home.

By incorporating distressed finishes and ornate details into the design of these frames, you can elevate the nostalgic appeal even further. Picture old family photographs exquisitely framed within intricately designed vintage-style panoramic frames, enhancing their historical significance and emotional value. Additionally, consider recreating historical events or capturing generational milestones using these retro-inspired frames to add layers of depth and meaning to your displays. Whether it’s a picture-perfect moment frozen in time or a snapshot from yesteryears’ family reunion, vintage frames have the power to amplify the sentimental essence of your photos.

Moreover, vintage-themed panoramas offer a unique opportunity to blend the old with the new, seamlessly merging modern photography techniques with classic aesthetics. You can achieve a harmonious fusion of past and present sensibilities by framing black-and-white images or applying artistic filters to digital prints within vintage-style frames. 

Transforming contemporary images into timeless treasures through the lens of nostalgia is not only a creative endeavor but also a heartfelt gesture that honors traditions and heritage. Let these vintage frames act as portals that transcend time, allowing you to relive precious moments while adding an elegant touch of antiquity to your living space.

Creating Impactful Wall Galleries

When transforming a room into a captivating space full of cherished memories, creating impactful wall galleries with panoramic photo frames takes center stage. By strategically arranging an array of varied-sized panoramas around a common theme or color scheme on your walls, you can curate a visual narrative that speaks volumes about your style and experiences. Imagine a gallery wall featuring panoramic frames showcasing your family’s milestones, from graduations to vacations, seamlessly tied together by a cohesive design aesthetic.

To achieve an aesthetically pleasing wall gallery:

  1. Consider mixing different sizes of panoramic frames to add depth and visual interest.
  2. For instance, intersperse more giant panoramas, capturing grand landscapes with smaller frames highlighting intimate moments for a balanced composition.
  3. Experiment with arranging the frames uniformly along an invisible grid to maintain symmetry or play with asymmetrical layouts for a more eclectic look.

By strategically spacing out the frames and ensuring they are aligned correctly, you can create a harmonious display that instantly elevates the ambiance of any room.

The beauty of creating impactful wall galleries lies in showcasing beautiful photographs and telling compelling stories through visual imagery. For example, imagine a collection of panoramic frames depicting your travel adventures arranged chronologically, taking viewers on a virtual journey across continents and cultures right from the comfort of your home. Additionally, thematic arrangements such as displaying panoramic frames dedicated to nature photography or black-and-white portraits can convey specific moods or evoke particular emotions within a space. These thoughtful compositions add layers of meaning and depth to your decor while serving as conversation starters for guests who admire your artistic flair.

By mastering the art of creating impactful wall galleries using panoramic photo frames, you can transform any blank wall into a dynamic focal point rich with personal significance. Whether you opt for a symmetrical arrangement exuding sophistication or prefer a more whimsical mix-and-match approach, each curated gallery has the potential to elevate the overall aesthetics of your living space. Embrace this creative endeavor as an opportunity to merge design prowess with storytelling finesse, resulting in visually stunning displays that not only adorn your walls but also capture and celebrate life’s most precious moments unforgettably.

Interactive Digital Displays

In the dynamic realm of panorama framing, interactive digital displays have emerged as a cutting-edge trend that seamlessly merges artistry with technology to offer innovative ways of showcasing cherished memories. Digital advancements have paved the way for interactive panoramas beyond traditional frame setups, introducing a new dimension of engagement and customization. Picture this: a digital photo frame where you can swipe through your favorite panoramic shots with a touch or gesture, creating an immersive viewing experience like never before.

These interactive displays elevate the presentation of moments captured in panoramic frames and enable users to curate their galleries with a modern twist. Imagine a living room adorned with digital panoramic displays cycling through breathtaking travel panoramas or heartwarming family moments, vividly capturing each memory’s essence. By harnessing these technological trends, individuals can breathe life into their spaces with ever-changing, mood-enhancing visuals that resonate with personal stories and experiences.

Moreover, interactive digital displays offer versatile options for customization, allowing users to change slideshow settings, add music accompaniments, or even integrate video clips for a multimedia-rich viewing experience. Whether reliving past adventures through an automatic slideshow feature or showcasing a mix of stills and motion in panoramic glory, these digital setups open up endless possibilities for creative expression and storytelling. Embracing this fusion of art landscape and tech features empowers individuals to transform their living spaces into dynamic galleries that evolve with their ever-growing collection of memorable moments.

Elevating Every Moment Through Panoramic Photo Frames

In conclusion, panoramic photo frames are more than mere decorations; they are portals to treasured memories. From enhancing home decor with personalized touches to celebrating special occasions and showcasing travel adventures, panoramic framing offers a breadth of creative possibilities to capture life’s exceptional moments. By carefully selecting and arranging these frames, individuals can infuse their living spaces with nostalgia, warmth, and personal narrative.

The sentimental value of choosing the right Panoramic photo frame strategy cannot be understated. Each panoramic frame becomes a time capsule, preserving not just images but emotions and stories that make up the tapestry of our lives. As we adorn our walls with these curated collections, we surround ourselves with reminders of love, joy, adventure, and connection—an ever-present celebration of the beautiful moments that define us. So, let every panorama framed in your home be a testament to a life well-lived and memories cherished for generations to come.

Continue Reading →
What Our Clients Say
2 reviews

Sign Up Newsletter

Sign up our newsletter and save 25% off for the next purchase!

Subscribe to our newsletters and don’t miss new arrivals, the latest fashion updates and our promotions.